DIY Brick Bookends
My due date was two days ago, but I’m not complaining since I only just finished my final nursery craft project yesterday: a pair of bookends made from bricks.
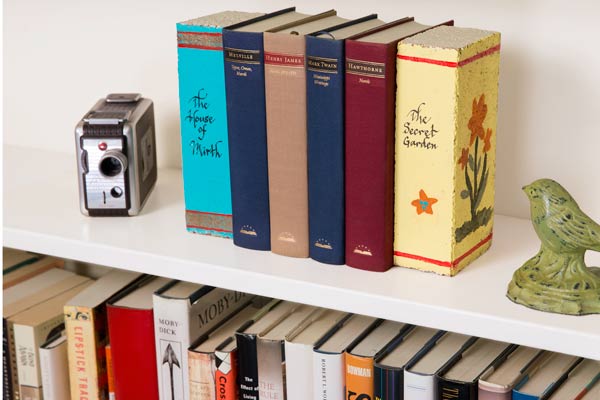
Like other craft projects, this one wasn’t original. You can watch a video on how to make brick bookends here and below are a few photos of different projects I found online. Each project has its charm, though the bricks are transformed into books with varying degrees of realism and flair.
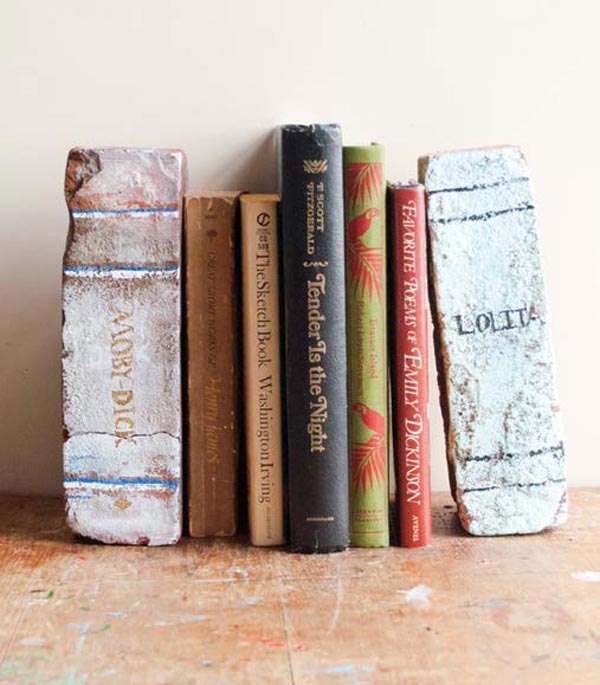
The simplest transformations involve hand-written text and hand-drawn lines, and the bricks are obviously not real books. As the script and detail improve, so does the illusion…
One Australian guy seems to have made a successful business out of producing brick bookends. The Melbourne-based company, Light Reading, produces brick books with the use of stencils (it seems).
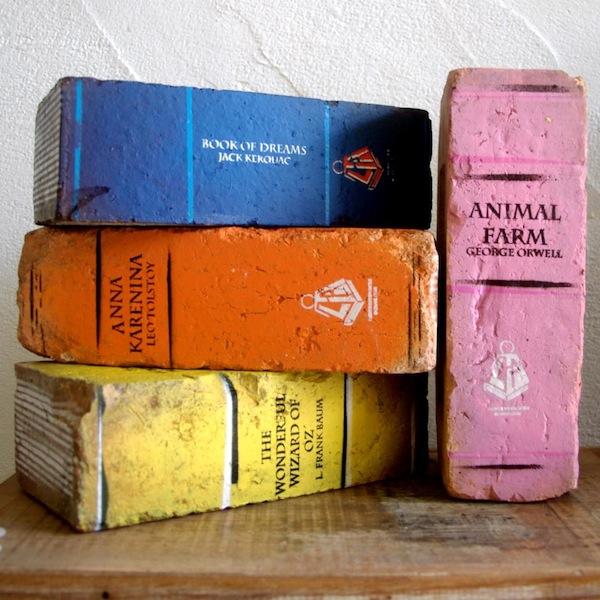
Some of the Light Reading creations look more realistic than others.

And some are decidedly more artistic and inspired in their design: proper works of art.
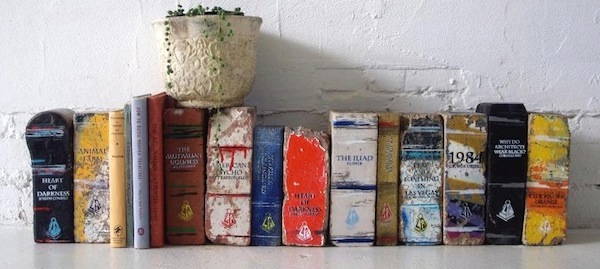
The quality and defects of the brick clearly help shape the end result in the most successful pieces.

But you still always know that they’re bricks somehow.
I’m not sure how much Light Reading charges for its bricks (before shipping) but I doubt any price would entice me to buy something I could make myself. It’s just a brick, after all, though in some instances, gorgeously transformed.
Alas, I decided mine needn’t be gorgeous, hip or inspired for my final nursery project. I’d settle for fun. 🙂
Of course, this project would only make sense to me if I already had the raw materials required to complete it. To my great fortune, my mother-in-law had her front driveway partially re-paved a few years ago.

And had 80-odd pavers left over that sat forgotten behind her car port.

I didn’t bother cleaning the bricks. They were still in almost pristine condition, so had a new look about them which already dictated that I would have a cleaner, neater end-product.
My first step was simply to cover the long edge and short edges that would represent the book ‘pages’ with painter’s tape…

Before painting my ‘book covers’ with acrylic paint…


Once the ‘book cover’ was dry, I re-applied tape to paint the ‘pages’.

I asked my husband what children’s book titles he preferred, and he offered Treasure Island. I decided my blue book would make the best Treasure Island – a purely coincidental replication of one of the Light Reading bricks above. For my other two titles, I chose Lord of the Flies (to be in black) and The Lion, the Witch and the Wardrobe (to be in green).
Before applying the text along the spines, however, I decided to create thematic symbols for each title. After a quick search for the right clip art, I made simple reverse stencils from index cards.

After painting a block of gold or silver along the spines, I applied the reverse stencils and repainted over the entire area in the book cover color, leaving only the gold or silver behind the stencil remaining.


With the aid of painter’s tape, I painted simple lines along the spines as well. Only one brick received any special treatment to its front cover though. After applying the larger anchor to the cover of my Treasure Island book, I decided that I wouldn’t attempt to do more to any of the covers. I just couldn’t be bothered.

At this stage, I was delighted with my brick books, their degree of realism, the simplicity of the design and the ease of the project. Things got a lot harder, however, when it came to considering the text.
I initially tried to handwrite the text with gold and silver markers and my husband wasn’t impressed. I admit that the results were sub-optimal. That I was writing with the swollen, stiff and painful hands of a pregnant woman post-term didn’t help.
Next, I tried to find an alphabet stencil small enough to paint the text, letter-by-letter, but I couldn’t find anything in the local stores and didn’t want to order anything online and wait for it to ship.
I even tried to create a stencil by printing text on card stock and painstakingly carving the letters out with an Exacto knife. That was a tedious exercise in failure.
I finally had to settle for gold alphabet stickers and found only one kind that could work. I was limited by the font, and the letters could have been slightly smaller, but I’m pretty happy with the result.

I had to settle for the authors’ initials at the top because the letters were too large. The initials at the bottom represent the faux publisher, the first letter of my husband and my surnames.
As I only had gold adhesive letters, I painted them silver for Lord of the Flies with a liquid silver pen.
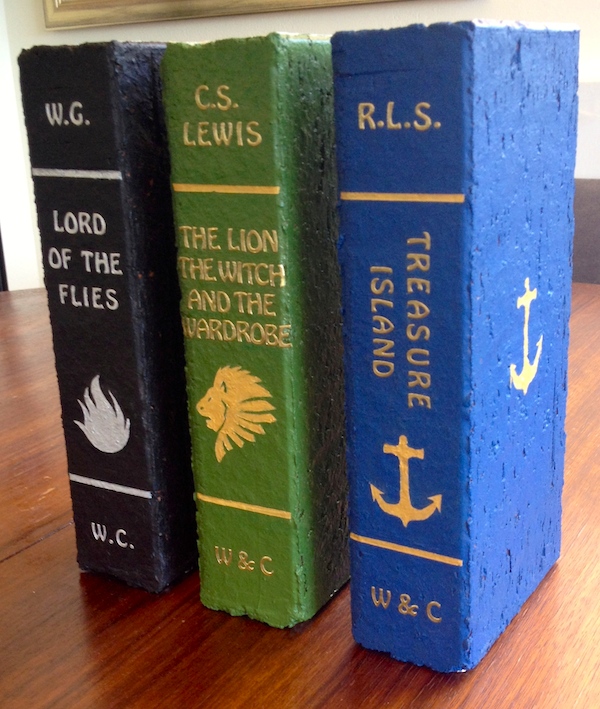
Sure, it’s a tight squeeze for the text of The Lion, the Witch and the Wardrobe, but I think this set of bookends achieves what I wanted for the nursery in terms of aesthetics…

And function…

One bookend was all that was needed for the windowsill.

And the other two will hold a few books on top of the chest of drawers.

So now my work is done! No more nursery craft projects to complete before the baby is born. Of course, I’m two days over due already, and my doctor won’t induce labor until I’m 12 days overdue.
So if you’re interested in what other craft projects I might complete in future, stay tuned, because I may just need to find something to do over the next week. 😉
DIY Book Display for Kids
 Perhaps a newborn doesn’t have much use for children’s books. Still, it’s never too early to start building a child’s library and nurturing the habit and pleasure of reading.
With no available space on any of our bookcases, all children’s books will have to live on our bedroom windowsill for the foreseeable future. That means I’ll have the pleasure of designing a set of bookends, if time permits. 🙂
A look at the two oversized children’s books leaning inelegantly against the smaller ones on my window sill, however, made me reconsider how to display the larger books.
I’m a huge fan of displaying children’s books with their covers face forward, rather than their spines, but it only works with large expanses of wall (or tiny collections).

A single lectern, on the other hand, allows the display of a few large picture books in a small space. Settled on making a lectern, I was determined to make use of any scrap wood or MDF that I already owned. For so small a project as this, I refused to spend any money on materials.
I used the largest piece of scrap plywood I had as a back rest, and cut two smaller pieces to act as a base and easel.


I joined the plywood with PVA wood glue and reinforced it with nails. The entire construction took a matter of minutes, and I couldn’t have been more pleased with the result.
That left the question of how to decorate the thing.
Paint it? A solid colour? Stripes? Too boring.
Cover it? With a paper collage? I liked that idea. But what kind of paper? Newspaper? We don’t buy print newspapers anymore. Comic book images? Not my Buffy. No siree. Nu uh. (And not age-appropriate anyway.) Dictionary pages? Could have worked, but I didn’t have an appropriate dictionary I was prepared to cut up. Pages from a children’s book?
Eureka.
Last year I made my mother-in-law a book cover collage from the duplicate and battered copies of classics in her extensive library.

I knew I was right to keep the books after I’d used the covers. I was bound to find a use for them at some point, and the yellowed, crumbling pages of an old edition of Alice in Wonderland was just what I needed.

I’d initially thought to use the full pages with text and illustrations, but abandoned the idea of using text altogether with so many provocative illustrations at my disposal. For the edges I cut out chapter titles.

This project was a simple cut and paste job with a layer of Mod Podge brushed over the surface to seal it.

But arranging the images to fit and overlap well was surprisingly time-consuming.

For that reason, I was sorely tempted to just paint the back and the bottom of the lectern… or cover it with felt… or leave it unfinished… or do anything other than cover it with more illustrations. But I relented and tackled the back and bottom as well.


This enables the lectern to be displayed at any angle, after all.

Of course, the point of this lectern is to display books, not stand alone…

So very little of my collage is actually visible.

But that’s no reason not to make a lectern to be proud of. 😉

DIY Lamp Makeover

At more than 38 weeks pregnant, I’m still on a craft tear, but the clock is ticking for me to wrap up my nursery projects.
A lamp makeover was hardly necessary, but my husband kept complaining about my bedside lamp for some reason. I never really minded it, but it was quite plain. Moreover, it encroaches on the beginning of the nursery wall in the bedroom that we’ll share with the baby, so it could benefit from a bit of color.
As per usual, this project was only going to satisfy me if I could make use of materials that I already owned; and seeing as I had heaps of yarn left over from my nursery mobile, I resolved to use it.
Besides, a second yarn-related piece in the room would better ground the nursery mobile in the space, and provide further texture for a cozier atmosphere.
Like most of my craft projects, this one wasn’t original. I spent a good bit of time Googling “lamp makeovers” that used yarn, and found a recurring aesthetic idea…


Painted bases and 3-toned horizontal bands of yarn were clearly the trend, and the shift from one colour to the next was universally handled with alternating stripes for added interest. I really hate being trendy, but I’m not so delusional or arrogant as to think that I’m immune from the influence of popular design aesthetics. I like the look of the shades, I admit. Would I have liked the shades ten years ago when they weren’t on trend? Who knows. But I was determined to mix things up – at least a bit – with my shade.
I don’t like the way the lamp bases are painted however – at least not the white ones. I’ve remained happily immune to the so-called ‘charms’ of painted white furniture, but you’ll find it everywhere and especially in nurseries. People seem to think that white paint makes furniture look ‘fresh’. But I think it makes it look cheap, with some exceptions.
Like past projects, this one was fun for the challenge of using pre-owned materials. I was limited in the colours of yarn I could use, and I was forced to work with a lamp shade with a much sharper angle, such that the yarn almost never stayed in place as I wrapped it around the shade. In the end, I resorted to using double-sided tape for every row, which worked like a dream.

I didn’t really have a colour or design plan as I worked…

I just stopped with one colour when it felt right, and switched to another, being mindful to start and stop along the shade’s primary seam. A dot of craft glue was used at the tips.

While the double-sided tape worked wonders as I went up the shade, the very top and bottom rows never did stay put without a final line of glue.

But in the end, the shade looked surprisingly tidy.

I was happy at this stage to call the project done, but my husband felt the base needed a coat of paint. Curiously, he suggested a dark grey – the very colour used in the example above – which he’d never seen. (That’s the strong and silent influence of trends for you.) But I’ve not been led astray in trusting his instincts yet.
As I was out of black acrylic paint, I had to make my own grey. And while I had every intention of making a true grey, I ended up with muted shade of blue. But what a happy coincidence that it so closely resembled the blue yarn that I’d used. Here’s the final result:

I’m still not convinced that the base needed painting, or that this was the best paint colour for it. And I acknowledge that the shade pattern is predictable. But I still like this lamp.
Of course, no one ever mentions or considers how these lamps will look at night, when the light is on.

Meh. Not so great. The light it gives off is pleasantly warm, but the lamp shade itself doesn’t look very nice with its colours so altered. But no biggie.

I’ll just admire it during the day. 😉


10 comments